Headless of course means no physical display is attached to the machine. “Headless” naturally also applies to machines in the cloud. In this illustrated guide we’ll show that when it comes to no-display boxes, there are pitfalls and best practices worth keeping in mind.
A typical problem with headless systems is that each time Windows starts, it doesn’t detect a monitor. Then it may default to a “safe” screen resolution that’s supported by any display (often that means lowest possible resolution). That “safe” resolution will likely result in usability nightmare. Even if you can set the right resolution from system settings, application icons are getting crammed into a small area at each startup.
So, what can you if you get wrong screen size, no matter the screen settings?
First, make sure the following parameters are turned off:
1. Automatic display detection (TMM). Although, on desktop computers it’s turned off by default and only enabled on laptops, you never know. So, make sure it’s disabled:
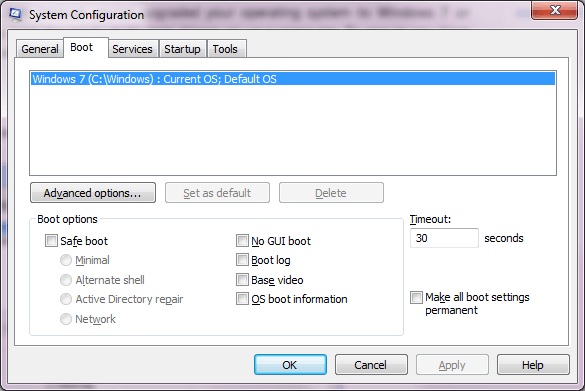
2. Base video should be disabled in boot settings. Run msconfig and open Boot tab to check.
3. Make sure no third-party apps like games (gaming on a headless computer, seriously?) interfere with the settings.
Also, there are some tricks/workarounds to deal with the display autodetection problem:
So, while there may be no problems setting the right default resolution, it’s a good idea to keep in mind some useful workarounds.
Sometimes, you’d want to setup autologin to the system. For example, to make this machine available to general public for stress/security testing or demonstration purposes. IMPORTANT: this may compromise the security not only for that machine but for the entire network it’s connected to.
Let’s configure automatic login (Windows Vista and 7).
1. Run netplwiz.
2. Choose the desired user account that should be logged in during boot up and disable the Users must enter a user name and password to use this computer checkbox.
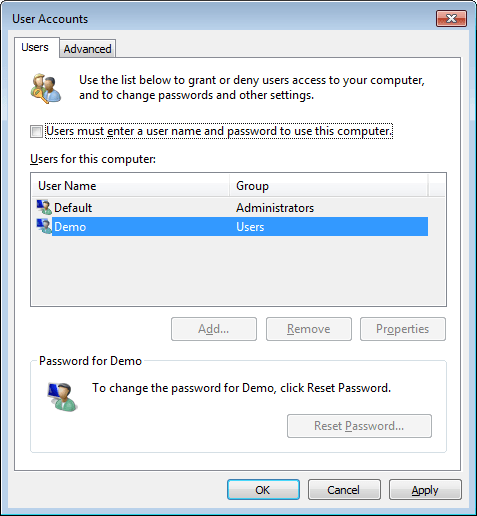
3. Enter the password. If the password is not set, then leave it blank. Then reboot the system. It won't show the login screen at the next boot up.
Also, autologin may be necessary when some applications or services won’t autostart until a specific user logs in. However, you can avoid using autologin here. You can simply trigger these apps to start before logon.
We’ll use Autoruns utility (from the SysInternals suite) to check what applications are started at user logon. In the app, we are managing autoruns for user account Demo. On the Logon tab, we see the list of apps automatically started at Demo’s logon.
Let’s enable Autoruns.lnk (the second group on the screenshot) to start before Demo’s logon.
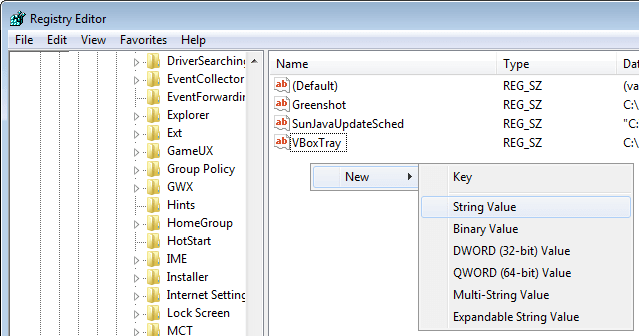
1. Open regedit, find branch HKEY_LOCAL_MACHINE\Software\Microsoft\Windows\CurrentVersions\Run
2. Create a new String type entry, give it an arbitrary name and set the path to the app executable as the entry value. The app will start upon system boot up.
That’s a general issue with any remote desktop connection, not only headless setups.
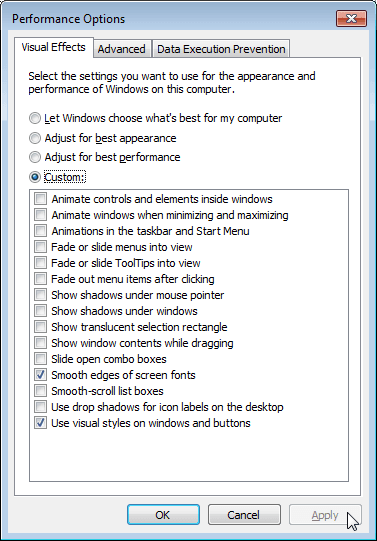
Disabling unnecessary animations and other eye-candy may improve remote control responsiveness. With RDP these settings might have little to no effect, but for third-party tools, it should have a big impact. Some effects may stay enabled of course (like smooth fonts and visual styles).
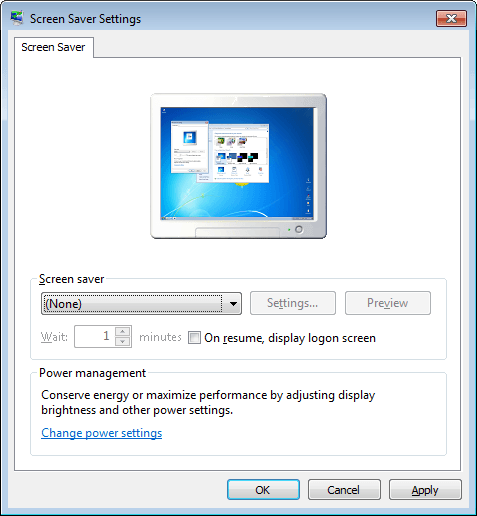
To avoid screensaver-related issues, we recommend disabling screensavers. Open Control Panel -> Appearance and Personalization -> Personalization.
Sometimes problems with peripherals might be caused by CPU’s C states. We all love green technology, so you'd want to leave all the C states enabled. However, if you have mysterious issues with peripherals or sudden shutdowns, C states are the thing to look at. Those are configured in BIOS.
Then, After Power Failure option should be set to Power On. This way, even if the machine goes offline, it will get back online when the black out is over.
Wake on LAN. While you may always keep remote computer powered on, it’s recommended to enable Wake on LAN, just in case. You never know.
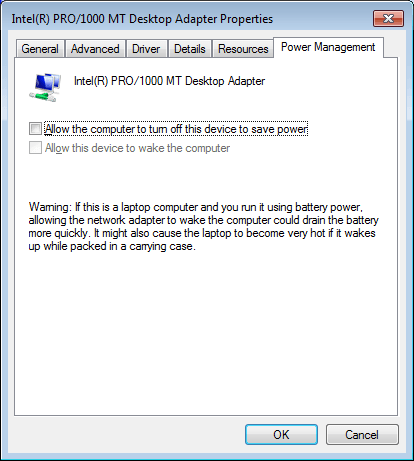
The obvious pitfall is that power save modes may cause the remote computer to become inaccessible.
Disabling power save for the WAN network adapter is the first and easiest thing to do. Open Device Manager, under Network Adapters select the adapter, open Properties, then Power Management tab and disable Allow the computer to turn off this device to save power.
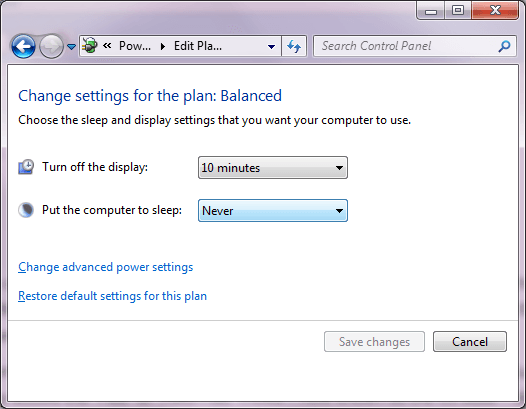
Hibernation states. To avoid possible wakeup issues, you may want to never put computer to sleep, as the existing power saving techniques should be fairly enough.
Sometimes it’s handy to have a webcam attached, just in case. Often, a simple look at the surroundings is very useful for diagnostics. You can see if some other equipment is powered and the lights are properly blinking, etc. Also, you won’t even need surveillance software, if you already have high speed remote access. Besides, you can use broadcasting platforms like Twitch.
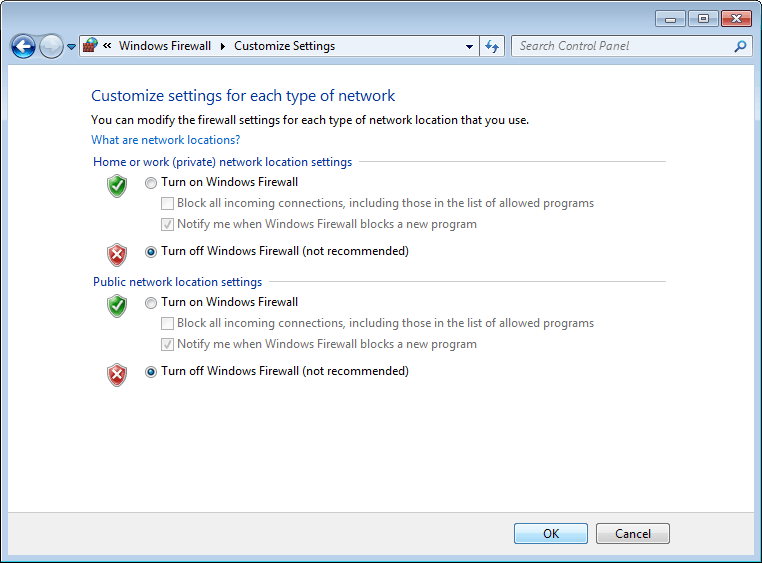
To make sure you have remote access, you should properly set up firewall rules. You can choose between the following alternatives:
1. Disable firewall (not safe!):
2. Enable rules for inbound RDP (Remote Desktop Protocol) connections:
Open Windows Firewall (shown above) and choose Advanced settings, then click Inbound rules and enable Remote Desktop (TCP-In) from the right-click menu.
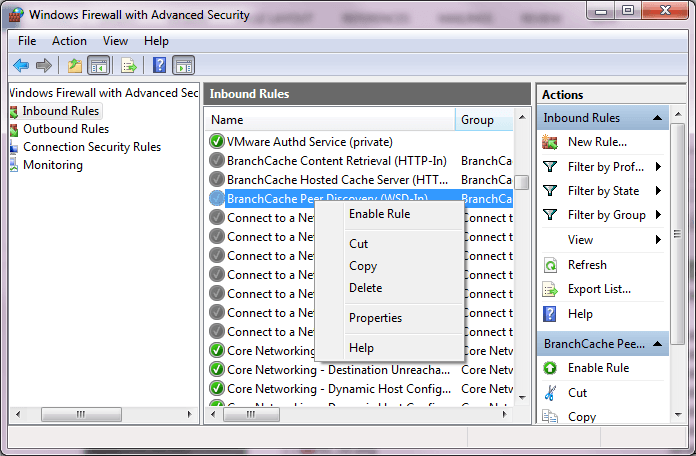
3. Rules created during installation of a program or added by user's choice when firewall asked for a permission (often done during the first launch of the program). This could be checked in Advanced settings as shown above. Just find the necessary application name. If it's not listed, then during the next launch Windows will ask user's whether to allow it or not.
If a third-party firewall is installed on the PC, then better read the official documentation for properly allowing incoming connections.
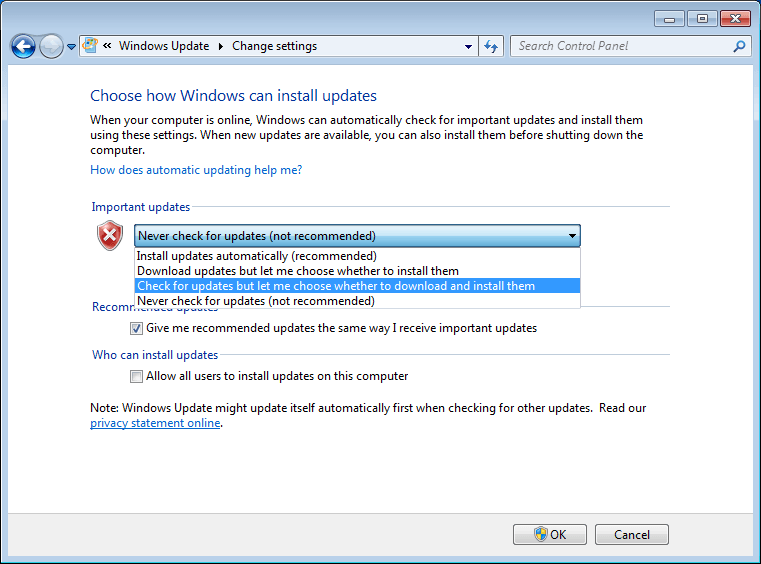
Manual updates are your best bet for a headless system. If some update makes the machine inaccessible, then you’ll always know when you installed the culprit. Then you can check how the updates affected the system and how the issue can be resolved.
Updates are configured via Windows Update Manager. Choose Change settings and select Download updates but let me choose whether to install them or Check for updates but let me choose whether to download and install them, whichever you find appropriate.
In both cases the updates will require user action to be installed.
Other posts you might like:
Setting Up Wake On LAN (Also On Macs)
DeskRoll Help Articles
Setting Up Ultra Budget Video Surveillance in No Time
Turning Your Laptop into a Wi-Fi Hotspot